How to start easily growing indoor microgreens for cheap.
Microgreens, expensive to buy, cheap to grow yourself. There’s been a lot of buzz about microgreens such as what they are and just how do you grow them. Let’s dig into the world of growing DIY indoor microgreens easily and inexpensively.
A few basics will get you started growing indoor microgreens. You will need a tray, good potting soil, seeds of your choice plus water and a source of light.
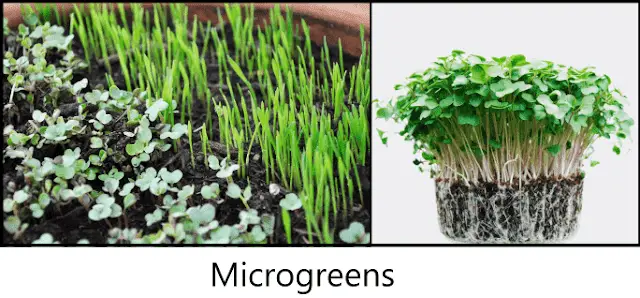
Let’s explain what we mean by the term microgreens. Microgreens is just a word created to describe young edible greens that have developed from seeds and picked or harvested while still at the seedling stage.
They have grown past the sprout stage and have seed leaves and are very nutrient-dense at this point.
Microgreens are young edible greens that have developed from seeds and picked or harvested while still at the seedling stage.
- How Can I Grow Microgreens At Home?
- Are Microgreens Easy To Grow?
- What Are The Health Benefits Of Microgreens?
- Can I Use Regular Seeds For Growing Microgreens?
- Do Microgreen Trays Need Holes and What Trays To Use?
- When To Harvest Microgreens?
How Can I Grow Microgreens At Home?
As noted above, you can get started easily with just a few items.
1) The first item is a tray or container to hold the soil.
- You can use almost any container you have around the house that will not breakdown or fall apart when wet.
- Think about food containers, plastic trays, flower pots can work too.
- A plastic tray works well because it provides a lot of area for the seeds.
2) The second item is soil.
- Choose good quality potting soil, preferably organic.
- If you prefer, you can use a soil-less seed-starting mix which is usually finer and less coarse than soil.
3) The third item are the seeds.
- Choose what you want to grow. There are numerous choices to pick from that vary from mild to spicy.
- Generally they will taste similar to their fully grown version.
- Some ideas to try are: Broccoli, Radishes, Lettuce Mix, Peas, Wheatgrass, Mustard, and Basil.
To Get Started:
- Fill your planter tray with an inch or 2 of soil. You don’t need much depth because the seeds will only grow for about 10 days before you harvest.
- Spread out the seeds across the entire surface of the soil to cover it completely. You want them fairly packed together as again, they will not grow to maturity.
- Spray them with a water bottle if you have one, else water them so they are moist but not soaking wet.
- Cover them with another tray or towel, something to block out all light. At this point they do not need any light and will do better in the dark.
- Every day mist the soil or water gently to keep it moist but not wet.
- After a few days the seeds will have sprouted, depending on the type of seed. When the sprouts are starting to grow remove the cover to allow them access to light. Continue to water them daily.
- Place the tray near a window. They need at least 8 hours of light a day. Add a grow light if needed.
- The microgreens should be ready to harvest in about 10 to 14 days.
To Harvest:
- Harvest when the microgreens are 1 to 3 inches tall. It will vary by what you choose to grow.
- You want to harvest when they develop seed leaves.
- Cut the microgreens with scissors just above the soil level.
- Do not pull out the microgreens, you want to cut them.
- Some seeds will continue to grow and produce for you to harvest a second or third time. Others will only have one harvest and it will be time to replant.
- Enjoy your microgreens right away or wash and store them in a plastic bag in the refrigerator.
Extras:
- You can reuse the tray of soil a couple times, just sprinkle a new batch of seeds right on top of the old.
- Don’t get or keep the soil too wet, it can rot the seeds or develop a fungus.
Microgreens grow and germinate best at room temperature, around 70 degrees F.
Microgreens require at least 8 hours of light per day and can be harvested generally in 10 to 14 days.
Harvest at 1 to 3 inches tall by cutting at soil level.
Check out my new article called: The 5 Best Indoor Garden Systems to see how easy it is for you to grow your very own garden inside.
Are Microgreens Easy To Grow?
Generally yes, microgreens are easy to grow. However, some seeds are easier than others. Some require you to soak the seeds for up to a day to get them started.
Try lettuce, broccoli, radish, and wheatgrass if you want something easy to grow.
Seeds are pretty inexpensive so don’t be afraid to try new things.
They are fun to try, taste great, and are nutritious.
What Are The Health Benefits Of Microgreens?
This is cited from Chefs-Garden.com:
— “In February 2017, Medical News Today took a look at health benefits of microgreens and cited a study from the Journal of Agricultural and Food Chemistry that shows how “microgreens do contain a higher concentration of many nutrients when compared with the mature, fully grown vegetables or herbs.” More specifically, Medical News Today shares, microgreens have high levels of:
- Phytonutrients
- Antioxidants
- Vitamins
- Minerals
- Enzymes
Because of the high levels of antioxidants, microgreens are “considered a functional food, a food that promotes health or prevents disease.””
Microgreens retain much of their nutrition because they are mostly consumed right away after harvesting. The longer any plant life sits around will diminish its nutrition value.
See my new article titled:
Mason Bee House DIY Info | What To Avoid And NEW Recommendations
Can I Use Regular Seeds For Growing Microgreens?
Of course. The seeds are the same, we’re just harvesting the plant much earlier when it is still young and growing.
You can buy individual seed packets or buy your seeds in bulk, it depends on how much you intend to grow.
Note that you will plant the individual seeds much closer together so it is better to buy seeds in bulk.
Also, look for seed mixes. These are prepackaged mixes of seeds intended for microgreen growers.
Do Microgreen Trays Need Holes and What Trays To Use?
You can use a planting tray with or without holes. But, no, the trays do not need or require drainage holes.
If your container has drainage holes, that is okay. In either case, you need to make sure the soil is moist but not too wet.
As stated above almost any container will work. Aluminum pie tin, plastic salad trays, etc.
When To Harvest Microgreens?
Depending on the seeds you have planted, it could take anywhere from 10 days to two weeks.
You will harvest when they have grown 1 to 3 inches tall and have developed their seed leaves.
Gently grab a handful of the microgreens and cut with scissors right above soil level.
| Seed Name | Days To Germinate | Days To Harvest | Skill |
| Broccoli | 2 to 4 Days | 6 to 10 Days | Easy |
| Mustard | 2 to 3 Days | 8 to 10 Days | Easy |
| Radish | 3 to 4 Days | 6 to 8 Days | Easy |
| Pea | 3 to 5 Days | 8 to 10 Days | Easy |
| Wheatgrass | 2 to 3 Days | 8 to 10 Days | Easy |
| Lettuce | 2 to 3 Days | 10 to 12 Days | Easy |
| Basil | 3 to 4 Days | 8 to 12 Days | Easy |
What Can You Use Microgreens For and How Do You Eat Microgreens?
Microgreens are versatile, eat them raw right after harvesting, add them to most any food as a garnish or topper, or add them to a smoothie.
Add them to soups, salads, eggs, pasta dishes. If you are cooking with them, add them right at the end as to not lose their nutritional value and texture.
There are countless ways to use and enjoy microgreens, use your imagination, and discover new ways to enjoy them.
Summary
Microgreens are packed with nutrition, easy to grow, taste great, and versatile as can be. A few basic supplies are all that are required to start easily growing indoor microgreens, some you may already have on hand. What better way to start a garden than easy microgreens growing indoor DIY.

