Samsung robot vacuum troubleshooting is for anyone experiencing issues with their POWERbot vacuum.
Answers to your Samsung robot vacuum problems are covered in my article as I discuss the most common issues users have.
Troubleshooting Samsung POWERbot Vacuums
- How Do You Reset A Samsung Robot Vacuum?
- Samsung POWERbot Models
- How Do I Connect My Samsung Robot Vacuum To WiFi?
- Where Is The Cliff Sensor On A Samsung POWERbot?
- What Is The App For Samsung Robot Vacuum?
- How Do I Update My Samsung Robot Vacuum?
- Samsung Robot Vacuum Error Codes
- Where Is The Reset Button On The Samsung POWERbot?
- How Do I Remove The Battery From My Samsung POWERbot?
- Samsung POWERbot Brush Not Spinning
- Summary
Robot vacuum problems can be a real headache. These intelligent devices make life easier when operating as expected. However, when issues arise it can be difficult to find answers. I tried to provide answers to the most asked questions, see if I answered yours.
How Do You Reset A Samsung Robot Vacuum?
There are two ways to reset a Samsung robot vacuum, by using the emergency switch or through the app. This reset also works for the Samsung force cyclone vacuums.
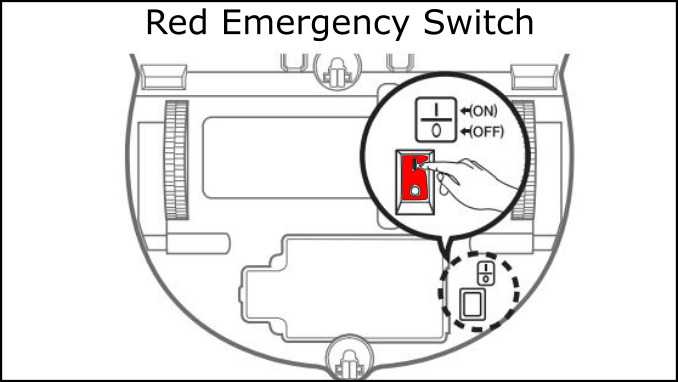
Underneath the POWERbot is a red emergency switch for you to use to power off the vacuum in urgent situations. Using this switch, power off the vacuum for about two minutes to reset the unit.
The second option to reset the POWERbot can be done with the Smart Home app. Open the app and under Settings find Connected members. Select your vacuum from the list and press Reset. This will disconnect and completely reset the vacuum from your Samsung account. Note, that you will have to re-register the unit back to your account.
A quick POWERbot reset can be done with the red emergency switch.
Samsung POWERbot Models
I’ve listed the models of the POWERbot vacuum in the table below.
| WiFI Enabled | Standard |
|---|---|
| VR2AR7260W SR2AJ9040W VR2AJ9250W SR2AK9350W SR1AM7040W VR2AM7065W VR2AM7070W VR2AM7090W | SR2AK9000U VR2AJ9010U VR2AJ9020U SR20H9050U SR2AH9051U VR1AM7010U |
How Do I Connect My Samsung Robot Vacuum To WiFi?
Connect your Samsung POWERbot to WiFi using the app. Three apps have been released for the vacuum, the latest being the SmartThings app. The steps are similar for all three but I’m showing the instructions for SmartThings since it is recommended by Samsung.
Connect POWERbot to WiFi:
- Open the SmartThings app.
- Select the + button on the top right of the screen and select ‘Add device‘.
- Find and select ‘Robot vacuum‘ from the list of available devices.
- Select ‘Start‘ and then select the room you want.
- On the remote control, press and hold ‘Clock‘ until ‘AP‘ is displayed.
- — For iPhone users: On your iPhone, open Settings and go to Wi-Fi to connect to the network name that starts with robot vacuum or vacuum. The password is 1111122222.
- On the remote, press and hold ‘Recharge‘ until you hear a beep.
- Select your network and enter your WiFi credentials.
The robot vacuum should be connected to your WiFi network now and you can edit the name of the vacuum if needed.
Note that 2.4 GHz is required for connection.
A WiFi router without authorization may be unavailable to be connected to the
POWERbot.
You need both the app and the vacuum’s remote control to set up WiFi.
I wrote another article titled Samsung Smart Refrigerator | Fix-Issues, read it if you want information on resolving issues with other smart appliances.
Where Is The Cliff Sensor On A Samsung POWERbot?
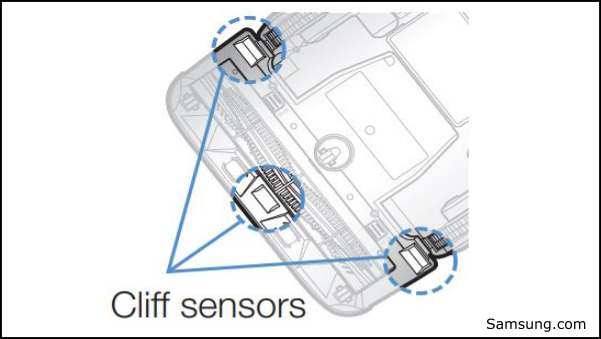
The Samsung POWERbot has a cliff sensor on either side of the vacuum and in the middle front, located underneath by the wheels. There are three sensor doors to protect each sensor as they use infrared technology to detect and sense when an edge is close by.
Look behind the brush, toward the outside of the base, and in front of the wheels.
What Is The App For Samsung Robot Vacuum?
Three apps have been available for Samsung’s robot vacuums, Smart Home, SmartThings, and PowerBOT. SmartThings is the newest app and suggested by Samsung to use.
The SmartThings app is available for download from both the Apple App Store and Google’s Play store. Requirements are iOS 12.0 or later or Android 7.0 and up.
Check out the new Samsung robotic mop with “Smart Sensor Wet Mopping Perfect for Tile, Vinyl, Laminate, and Hardwood”. As an Amazon Associate, I earn from qualifying purchases. PLEASE READ MY DISCLOSURE FOR MORE INFO.
How Do I Update My Samsung Robot Vacuum?
The Samsung robot vacuum updates itself when it is in the dock charging and has internet access. The vacuum will periodically check for new firmware and download and install it automatically.
The POWERbot will display an ‘UP’ on its panel indicating the software is currently in the process of downloading and updating.
Note: Some users report it taking up to 4 days to update the software as it can be extremely slow… This is not the norm though, it should not usually take nearly this long.
An option you can try to check if there is an update is by using the app. See below.
- Open the SmartThings app.
- On the Home screen, open the Apps screen.
- Select the Samsung folder, and then SmartThings.
- Find ‘All devices’ and select the ‘Devices’ tab, and then the ‘Location’ drop-down menu.
- Select All Devices, and then select the device you want to check for updates.
- Select ‘More Options’ (three vertical dots), and then ‘Information’.
- ‘Firmware Update’ will show if one is available.
Read my other top articles:
Samsung Robot Vacuum Error Codes
The table below lists the Samsung robot vacuum error codes. Check the display on your vacuum for these codes.
| Error Codes | POWERbot Error Code Meaning |
|---|---|
| C01 | Stuck object |
| C02 | Left driving wheel stuck |
| C03 | Right driving wheel stuck |
| C04 | Auto shutter tool stuck |
| C05 | Bumper sensor blocked |
| C06 | Obstacle sensor blocked |
| C07 | Cliff sensor blocked |
| C11 | Error with main control board |
| C13 | Camera calibration error |
| C14 | Camera calibration error |
| C57 | Obstacle sensor error |
| nobatt | Stuck Object |
| UP 5 | Software Updating |
Where Is The Reset Button On The Samsung POWERbot?
The reset button on the POWERbot is located underneath the unit. It is a red emergency switch protected by a clear cover. See the picture for its location. I covered how to reset the vacuum above, see that topic for more information.
How Do I Remove The Battery From My Samsung POWERbot?
The battery on the POWERbot is located under a panel on the underside of the vacuum. Remove two screws holding the panel in place. The battery will need to be disconnected from its plug to be removed. These batteries are Lithium-Ion 21.6V and either 10W or 20W.
Steps To Remove Battery From POWERbot:
- Turn over POWERbot and switch off its power using the red emergency button.
- Locate the large panel in the rear of the unit. Unscrew the two screws holding it in place.
- Lift out the battery partway and unplug its connector from the vacuum.
- Completely remove the battery from the POWERbot and replace it if needed.
Note: The battery warranty period is 6 months from the date of purchase.
The POWERbot batteries are Lithium-Ion 21.6V and either 10W or 20W.
Samsung POWERbot Brush Not Spinning
If your POWERbot brush is not spinning anymore you will need to remove and clean the brush. Start by removing the brush cover by releasing two clips. With the cover out of the way, lift out the brush. Clean the brush thoroughly of any obstructions as well as the brush well. Now replace the brush and cover.
If you are still experiencing issues with the brush, contact Samsung support for help.
Summary
Robot vacuum troubleshooting can be accomplished by most users if the information can be found. Hopefully, this article covered your questions and enabled you to get your vacuum working again. I created a web story on this post called POWERbot Fixes, please check it out.

I’m J.S., I created and am the content manager at DIYHouseSkills.com. I do the research and write the articles that appear on this website. I’ve learned many household skills during my life and think it’s important to at least know the basics so that you can save yourself time and money… READ FULL BIO >
- DIY Secrets: Finding and Using the Bosch Ice Maker Reset ButtonHow do I find and use the Bosch ice maker reset button? The Bosch ice maker reset button is typically located at the front or side of the ice maker unit. To reset your Bosch ice maker, press and hold… Read more: DIY Secrets: Finding and Using the Bosch Ice Maker Reset Button
- Say Goodbye to Stubborn Stains on Stainless Steel PotsImmediate Answer Effectively cleaning stainless steel pots involves a few straightforward steps. First, rinse the pot with warm water to remove any loose debris. Next, scrub with soapy water using a non-abrasive sponge. For tough stains, use a paste of… Read more: Say Goodbye to Stubborn Stains on Stainless Steel Pots
- Effortlessly Remove Mold From Tile Grout with These Easy StepsImmediate Answer To effectively remove mold from tile grout, you need to follow a systematic approach that ensures both the mold is eradicated and future growth is prevented. The process involves using appropriate cleaning agents such as baking soda, borax,… Read more: Effortlessly Remove Mold From Tile Grout with These Easy Steps
- Proven Strategies to Unclog Your Kitchen Sink EfficientlyUnblocking a kitchen sink can seem like a daunting task, but with the right tools and techniques, you can quickly restore your sink’s functionality without the need for professional help. This guide will walk you through a step-by-step process to… Read more: Proven Strategies to Unclog Your Kitchen Sink Efficiently
- Outlet Not Working, Breaker Not Tripped | AdviceWhat To Do When Your Outlet Is Not Working But The Breaker Isn’t Tripped Experiencing an outlet that’s not delivering power can be perplexing, especially when the circuit breaker hasn’t been tripped. This common issue can often be resolved without… Read more: Outlet Not Working, Breaker Not Tripped | Advice
