Despite their importance in our morning routines, coffee makers are often overlooked when it comes to regular cleaning. However, neglecting to clean your coffee maker can have a significant impact on the quality and healthiness of your daily brew.
In this post, we will explore the reasons why regular cleaning of your coffee maker is crucial. We will provide a simple and effective cleaning method, along with tips to maintain optimum performance.
As a seasoned coffee connoisseur with years of brewing expertise, I will guide you through this process using case studies and practical examples.
- Why Clean Your Coffee Maker?
- When and How Often Should You Clean Your Coffee Maker?
- The Basics of Coffee Maker Cleaning
- Cleaning Your Coffee Maker: A Creative Approach
- Example: The Impact of Regular Cleaning
- Pro Tips for Coffee Maker Maintenance
- Expert Coffee Hacks: Unlocking the Next Level of Brewing
- A Step-by-Step Guide to Cleaning Your Keurig or Other Pod Coffee Maker
- The Inside Scoop: Why Your Coffee Maker Craves a Clean
- Frequently Asked Questions (FAQs)
- Conclusion: The Clean Coffee Maker Advantage
If you’re seeking a tastier and healthier daily brew, this guide is a must-read. Let’s ensure your coffee maker is clean, so you can enjoy better-tasting coffee than ever before.
Be sure to check your coffee maker’s instruction manual for their specific cleaning recommendations and schedule. They may list special care instructions as vinegar can damage some metals.
Why Clean Your Coffee Maker?
Many coffee lovers may not realize the negative effects that a dirty coffee maker can have on their favorite morning ritual.
Over time, the residual oils from the coffee beans can build up within your machine, leading to a stale and bitter taste that is a far cry from the fresh, rich flavors of a clean brew.
Moreover, the warm, damp environment of a coffee maker can become a breeding ground for bacteria and mold, raising significant health concerns.
In a study conducted at the University of Valencia, researchers found a variety of bacteria and fungi present in coffee makers that had not been cleaned regularly. This not only affects the taste of your coffee, but can also lead to a number of health issues such as allergies and infections.
Therefore, it is essential to clean your coffee maker regularly to ensure a delicious and safe coffee experience.
Furthermore, a clean coffee maker runs more efficiently, prolongs the life of your machine, and helps you enjoy the true taste of coffee at its best.
Cleaning your coffee maker is not a luxury, but a necessity for every coffee aficionado.
Essential and Optional Items for Coffee Maker Cleaning
Before beginning the cleaning process, make sure you have the necessary items at hand. Here’s a list of the essentials you’ll need:
- White Distilled Vinegar: This common household item is a natural descaler that can easily clean and sanitize your coffee maker.
- Water: Preferably filtered, to rinse your coffee maker after the vinegar cycle.
- A Clean, Dry Cloth: For wiping down the exterior of your coffee maker to keep it looking its best.
- Soft Brush or Old Toothbrush: To clean hard-to-reach areas and remove any stubborn grime.
While the above items are enough to clean your coffee maker, the following items are not necessary but can be nice to have:
- Coffee Machine Cleaning Solution: If you prefer a store-bought cleaner, there are many commercial products available that are specifically designed to clean coffee makers.
- Descaling Solution: Regular use of a descaler can prevent mineral buildup and keep your coffee maker functioning at its best.
- Baking Soda: A baking soda and water solution can be used as a natural alternative to a store-bought cleaning solution.
- Lemon Juice: If you don’t like the smell of vinegar, lemon juice can be used as a natural substitute. It’s also an excellent descaler but may require a few more rinse cycles to remove the citrus scent entirely.
By having these items on hand, the coffee maker cleaning process will be efficient and hassle-free.
When and How Often Should You Clean Your Coffee Maker?
This part of the guide will provide you with a practical cleaning schedule for your coffee maker, calibrated for different usage levels and coffee maker models.
As a coffee enthusiast, I recommend cleaning your coffee maker at least once a month, but it could be more frequently depending on your coffee consumption habits.
If you’re a heavy coffee drinker or use a coffee maker in a shared setting, like an office, weekly cleaning would be more appropriate.
Here’s an easy-to-follow schedule based on usage:
- Daily Use: Rinse removable parts like the carafe and filter basket with warm soapy water.
- Weekly Use: If you use your coffee maker heavily, deep clean it once a week.
- Monthly Use: For average coffee drinkers, a thorough monthly cleaning should suffice.
Beyond the regular cleaning schedule, it’s essential to be aware of specific signs that indicate your coffee maker requires an immediate clean.
Signs Your Coffee Maker Needs Cleaning
Maintaining your coffee maker in its prime condition isn’t just about sticking to a cleaning schedule; it’s also about knowing when it’s crying out for help.
Here are some clear signs that indicate your coffee maker needs cleaning:
- The Coffee Tastes Off: If your morning brew doesn’t taste quite right, it might not be the beans. Old coffee residue can alter the flavor of your coffee, making it taste bitter, stale, or just plain wrong.
- Extended Brew Time: If it’s taking noticeably longer for your coffee to brew, it’s likely that mineral deposits or old coffee grinds have clogged the machine. This affects the efficiency of your coffee maker and the quality of your brew.
- Your Coffee Isn’t Hot Enough: If your coffee isn’t staying hot for long, or doesn’t seem hot enough to start with, the hot plate or internal heating system may need cleaning.
- Visible Residue: If you can see residue or buildup in the water reservoir or around the seals, it’s time for a cleaning session.
- It Has Been A While: If you can’t remember the last time you cleaned your coffee maker, it’s probably overdue for a comprehensive clean.
Don’t wait for these signs to show up before you decide to clean your coffee maker.
So, always stay alert to these signs and make sure to keep your coffee maker in its best form for that perfect cup of coffee.
Remember, a clean coffee maker is the key to a great cup of coffee. So make this routine a part of your coffee-making process.
Signs Your Coffee Maker Needs Cleaning
Maintaining your coffee maker in its prime condition isn’t just about sticking to a cleaning schedule; it’s also about knowing when it’s crying out for help. Here are some clear signs that indicate your coffee maker needs cleaning:
- The Coffee Tastes Off: If your morning brew doesn’t taste quite right, it might not be the beans. Old coffee residue can alter the flavor of your coffee, making it taste bitter, stale, or just plain wrong.
- Extended Brew Time: If it’s taking noticeably longer for your coffee to brew, it’s likely that mineral deposits or old coffee grinds have clogged the machine. This affects the efficiency of your coffee maker and the quality of your brew.
- Your Coffee Isn’t Hot Enough: If your coffee isn’t staying hot for long, or doesn’t seem hot enough to start with, the hot plate or internal heating system may need cleaning.
- Visible Residue: If you can see residue or buildup in the water reservoir or around the seals, it’s time for a cleaning session.
- It Has Been A While: If you can’t remember the last time you cleaned your coffee maker, it’s probably overdue for a comprehensive clean.
By being vigilant about these signs, you can ensure that your coffee maker always performs at its best, and continues to provide you with a delightful coffee experience each day. Don’t wait for these signs to show up before you decide to clean your coffee maker. Make it a part of your routine, and your taste buds will thank you.
The Basics of Coffee Maker Cleaning
Now let’s move on to my step-by-step guide on how to clean your coffee maker effectively and safely.
- Unplug the Coffee Maker: Always start by unplugging your coffee maker to ensure your safety during the cleaning process.
- Remove Removable Parts: Take apart any removable components of the coffee maker. This typically includes the carafe, filter basket, and any other parts that come into contact with coffee or water.
- Wash Removable Parts: Wash these parts in warm, soapy water and rinse thoroughly. Avoid using harsh detergents as they can leave a residue that affects the taste of your coffee.
- Prepare a Vinegar Solution: Mix equal parts of white vinegar and water. This solution will not only cleanse your coffee maker of oils and buildup but also descale the heating elements.
- Run a Vinegar Cycle: Fill the water reservoir with the vinegar solution and run a brewing cycle. Midway through, turn off the coffee maker and let it sit for an hour before completing the cycle.
- Run Water Cycles: After the vinegar cycle, run at least two cycles with plain water to flush out any residual vinegar smell or taste.
- Wipe Down the Machine: Using a damp cloth, wipe down the exterior of the machine. Be sure to clean the area around the coffee filter where residue can accumulate over time.
- Reassemble and Brew: Once all the parts are clean and dry, reassemble your coffee maker. It’s now ready to brew the freshest and tastiest coffee.
Tip: Be aware that running a clean or brew cycle will emit a strong vinegary aroma due to the vinegar and water solution – but don’t worry; this is normal.
Related: Dishwasher Have A Bad Odor? | Best Way To Clean
Professional Secrets for Cleaning
Scott Rao, a coffee consultant and author of “The Professional Barista’s Handbook,” suggests that using a mixture of hot water and a little bit of rice can help clean the grinder effectively.
The rice acts as an abrasive, scrubbing away coffee residue without harming the grinder. However, Scott warns against the use of instant rice, which can damage the grinder due to its hardness.
Cleaning Your Coffee Maker: A Creative Approach
Sure, we’ve provided you with the standard step-by-step guide for cleaning your coffee maker. But for those who fancy a more inventive approach, let’s dive into a creative perspective. Picture this as a coffee brewing ritual you never knew you needed.
1. The Unplugging Ceremony
Before we start, remember to unplug your coffee maker. Consider it as ‘switching off’ from the noise and chaos. A moment of silence, if you will, before we begin the cleaning process.
2. Disassembling: The Puzzle Activity
Next, disassemble the parts. See this process as solving a puzzle. Each piece counts and contributes to the final picture – and in this case, the perfect brew!
3. The Water Dance: Cleaning the Parts
Then, let your coffee maker parts take a warm, soapy bath. This is the ‘water dance’, where grime and residue get washed away, preparing for a fresh start.
4. The Acid Test: Preparing Vinegar Solution
Mix equal parts white vinegar and water. This is where we get a little ‘science-y’. The vinegar solution acts as a natural cleanser, removing buildup and scaling the heating elements.
5. Vinegar Spa: Running the Cycle
Pour the vinegar solution into the reservoir and run a brewing cycle. This is the ‘vinegar spa’, a detox session for your coffee maker. Halfway through the cycle, let it take a breather – an hour’s break before completing the full spa session.
6. The Freshwater Flush
Post the vinegar spa, it’s time for a freshwater flush. Run at least two cycles with clean water. Consider this as the refreshing rain shower after a long, relaxing spa day.
7. The Makeover: Wiping the Machine
Give your coffee maker a little exterior makeover by wiping it down with a damp cloth. It’s all about looking fresh on the outside while being fresh on the inside!
8. Reassembling: The Grand Finale
Once all the pieces are sparkling clean and dry, put them back together. This is the climax – the grand finale, where your coffee maker, rejuvenated and gleaming, is ready to brew the most satisfying cup of coffee.
Switch things up with this fun and imaginative cleaning routine. Not only does it make the task more enjoyable, but it also makes your coffee taste better. So why not give it a try?
Example: The Impact of Regular Cleaning
In this section, we’ll share a real-life example showing the noticeable difference that regular coffee maker cleaning can make to the quality of your brew.
Meet John, a coffee aficionado who prides himself on brewing the perfect cup of coffee every morning. Recently, John realized his coffee wasn’t tasting the same. It lacked the robustness he loved, and each sip seemed less flavorful.
Puzzled and a little frustrated, John wondered if the quality of his coffee beans had changed. But even after switching to a different brand, the problem persisted. That’s when it hit him – he hadn’t cleaned his coffee maker in quite some time.
Reluctantly, John followed the cleaning process outlined in this guide.
He disassembled his coffee maker, gave its components a warm soapy bath, ran a cycle with a vinegar solution, flushed it with fresh water, and wiped down the exterior.
After reassembling it, he brewed a fresh pot of coffee. The difference was clear. His coffee had regained its rich, full-bodied flavor, much to his delight.
This simple example of John’s experience underscores the importance of regular coffee maker cleaning. Not only can it restore the taste of your coffee, but it’s also an effortless way to extend the lifespan of your machine.
Pro Tips for Coffee Maker Maintenance
As a seasoned coffee enthusiast, I’ll share my personal tips and tricks for maintaining your coffee maker in top condition, ensuring the best taste for your daily brew.
Pro Tips for Coffee Maker Maintenance
- Frequent Cleaning: Regular cleaning cannot be stressed enough. Aim to clean your coffee maker thoroughly at least once a month. The more often you brew, the more often you should clean.
- Daily Rinse: Rinse the carafe and any other removable parts after every use. This prevents buildup from accumulating and saves you time during deep cleanings.
- Use Filtered Water: To minimize mineral deposits, use filtered water whenever possible. This also enhances the taste of your coffee.
- Replace Filters and Parts: Don’t overlook the importance of replacing your coffee filters and other parts. Old or clogged filters can affect the quality of your coffee, while worn out parts can lead to malfunctions.
- Store in a Dry Place: After cleaning, make sure to store your coffee maker in a dry place to prevent mold and mildew
- Proper Coffee Storage: Preserve the flavor of your coffee by storing it correctly. After opening, coffee beans should be kept in an airtight container, away from light, heat, and moisture. In an ideal world, store your coffee in a cool, dark cupboard to keep it fresh longer. Freezing coffee is a topic of debate among experts – if you choose this route, ensure it’s sealed tight to avoid the absorption of freezer odors.
- Dishwashing Coffee Maker Parts: Some parts of your coffee maker may be dishwasher-safe, but always check the manufacturer’s instructions first. While the glass carafe and filter basket can often withstand a dishwasher, parts like the water reservoir or heating element should never go in. Hand-washing these pieces helps maintain their integrity and longevity.
Expert Coffee Hacks: Unlocking the Next Level of Brewing
As a home barista and a lifelong coffee lover, I’ve picked up a few tricks along my journey that have revolutionized my brewing game.
Let’s dive into these advanced tips for fellow coffee connoisseurs who are chasing the perfect cup.
- Quality Water Matters: Always use fresh, cold water for brewing. If your tap water doesn’t taste good to begin with, it’s not going to make a great cup of coffee. Invest in a water filter or use bottled spring water.
- Be Mindful of Proportions: The coffee-to-water ratio is crucial. A general rule of thumb is two tablespoons of coffee for every six ounces of water, but feel free to adjust to your taste.
- Grind Immediately Before Brewing: Coffee grounds start to lose flavor as soon as they’re exposed to air. For the freshest taste, grind your beans immediately before brewing.
- Mind the Temperature: Water that’s too hot can over-extract your coffee, leading to a bitter taste. The optimal brewing temperature for coffee is between 195 and 205 degrees Fahrenheit.
- Don’t Let Coffee Sit: Coffee begins to lose flavor as soon as it’s brewed. Avoid leaving coffee sitting on the burner for more than 20 minutes. Instead, brew only what you plan to drink immediately, or transfer the coffee to a thermal carafe to keep it hot without cooking it further.
- Clean Your Equipment Regularly: Even the smallest amount of residue or buildup can affect your coffee’s flavor. Deep clean your coffee maker at least once a month, or more frequently if you’re a heavy coffee drinker.
Remember, the perfect cup of coffee is subjective and varies from person to person. So, feel free to experiment with these tips until you find your perfect brew.

A Step-by-Step Guide to Cleaning Your Keurig or Other Pod Coffee Maker
Keurig or pod-based coffee makers are not exempt from the coffee residue and mineral build-up that can compromise your favorite morning ritual. Regular cleaning is paramount in ensuring that your cup of joe is consistently delicious and your machine remains in top shape for years to come.
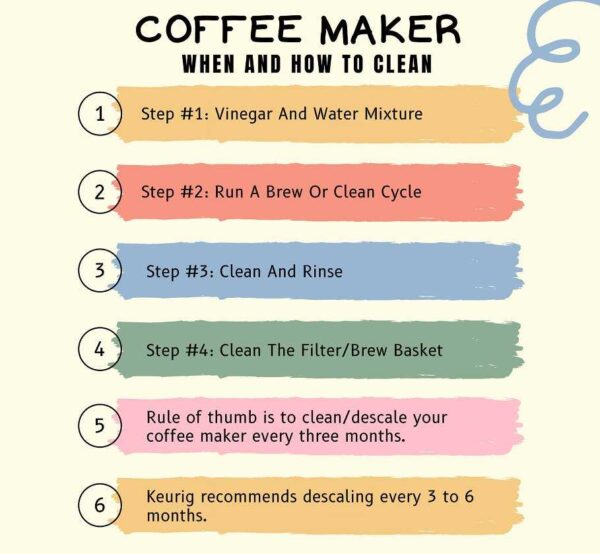
Keurig itself advocates for descaling every 3 to 6 months, depending on usage.
Here’s a comprehensive, easy-to-follow guide on keeping your pod coffee maker pristine.
- Choose your Cleaner: Keurig offers a specially designed descaling solution that is safe and efficient. Alternatively, a homemade mixture of vinegar and water in a 1:1 ratio can also do the trick. Both options effectively dissolve minerals and oils left by coffee beans.
- Preparation: Start by emptying the water reservoir. If your machine has a water filter, remove it before proceeding. Additionally, ensure that there’s no pod inside the machine. Ready a large mug to catch the liquid during the cleaning cycles.
- Descaling Process: Fill up the reservoir with your chosen descaling solution or vinegar-water mix. Position your mug and initiate a large brew cycle. Continue running cycles until the cleaning solution is completely used up. This process effectively eliminates the build-up inside your machine.
- Rinse and Repeat: After the descaling process, it’s important to clear out any residual cleaner. Fill the reservoir with clean water and run several cycles until there’s no trace of the cleaning mixture left. This ensures that your next cup of coffee is not tainted by the descaling process. Repeat this rinsing process at least twice for optimal results.
By adhering to this simple maintenance regimen, you can extend the lifecycle of your Keurig or pod coffee maker, delivering stellar coffee with each brew.
The Inside Scoop: Why Your Coffee Maker Craves a Clean
Think your coffee tastes off? Your coffee maker could be crying out for a clean. Yes, it’s not just about the beans and brew – a clean coffee machine can be the magic wand that transforms your coffee experience.
Let’s get scientific for a moment. Vinegar, which is an acid, has the power to dissolve mineral deposits and eradicate bacteria. Each brew cycle leaves behind an oily remnant, which, if not removed, can cause your coffee to taste bitter or stale.
Not convinced yet? Let’s look at some startling facts. NSF International, a public health and safety organization, ranks the coffee reservoir as the fifth germiest place in your home. It’s a perfect breeding ground for bacteria, mold, and mildew, all thanks to its dark, damp location.
And there’s more. Minerals present in water can accumulate on the heating element over time, resulting in longer brewing times and lukewarm coffee. So, if you’ve been wondering why your coffee doesn’t have the same kick as before, it’s time to give your coffee maker the TLC it deserves.
Cleaning your coffee maker isn’t just about taste, it’s about health, efficiency, and the longevity of your machine. So go on, show your coffee maker a little love, and your tastebuds will thank you.
Frequently Asked Questions (FAQs)
Q1: Can I use bleach to clean my coffee maker?
While bleach is a potent disinfectant, it is not recommended for use in cleaning your coffee maker due to its corrosive nature and potential health risks if not thoroughly rinsed out.
Q2: How often should I clean my coffee maker if I use it daily?
If you’re a daily coffee drinker, it’s advisable to deep-clean your coffee maker at least once a month. Regularly rinsing removable parts after each use also helps keep it in pristine condition.
Q3: Are store-bought descaling solutions better than homemade vinegar solutions?
Both options can be effective. Store-bought solutions may be specifically designed for coffee makers and thus potentially more effective, but a vinegar-water mixture is a cost-effective and natural alternative.
Q4: Why is my coffee tasting bitter even after cleaning my coffee maker?
Bitterness can result from various factors, including coffee beans, water quality, or brewing time. If bitterness persists after cleaning, consider trying a different coffee blend or adjusting your brewing process.
Q5: Can I use the same cleaning method for all types of coffee makers?
While the fundamentals of cleaning remain similar, each type of coffee maker might have unique components that require specific cleaning techniques. Always refer to the user manual for precise cleaning instructions.
Q6: Does hard water affect my coffee maker’s performance?
Yes, hard water can lead to mineral build-up in your coffee maker, affecting its performance and the taste of your coffee. Using filtered or distilled water can help mitigate this issue.
Conclusion: The Clean Coffee Maker Advantage
To wrap up the guide, we’ll recap the advantages of regular coffee maker cleaning and maintenance. We’ll also provide some actionable next steps for you to start implementing these cleaning habits right away.
In conclusion, regular maintenance of your coffee maker is not a luxury, it’s a necessity. Not only does it enhance the flavor and aroma of your brew, but it also extends the life of your coffee machine, improves its efficiency, and provides a healthier, cleaner environment for your favorite beverage.
It’s a simple process that pays off in dividends, especially for the coffee aficionados among us.
So, why not take a few minutes out of your day to ensure your coffee machine is as clean and efficient as possible? Start incorporating these steps into your routine now and you’ll undoubtedly notice a difference in your morning cup of joe.
Remember – a clean coffee maker is the secret to the perfect brew.

I’m J.S., I created and am the content manager at DIYHouseSkills.com. I do the research and write the articles that appear on this website. I’ve learned many household skills during my life and think it’s important to at least know the basics so that you can save yourself time and money… READ FULL BIO >
More Resources:
- Self-Watering Gardens for Small Spaces: Grow Big in Tiny Places
- How To Conserve Water At Home | How Can I Lower My Water Bill?
- Outdoor Pizza Oven Buying Guide | How to Buy
- Top Stand Mixers on Amazon: Most Wished For
- Samsung Robot Vacuum Troubleshooting + Advice
- One-Piece vs. Two-Piece Toilets: Making the Right Choice
