In this blog post, we will show you how to install Fleximounts overhead garage storage quickly and easily. We will also discuss some of the benefits of using Fleximounts’ storage products.
And finally, we will answer some of the most common questions about Fleximounts’ overhead garage storage system.
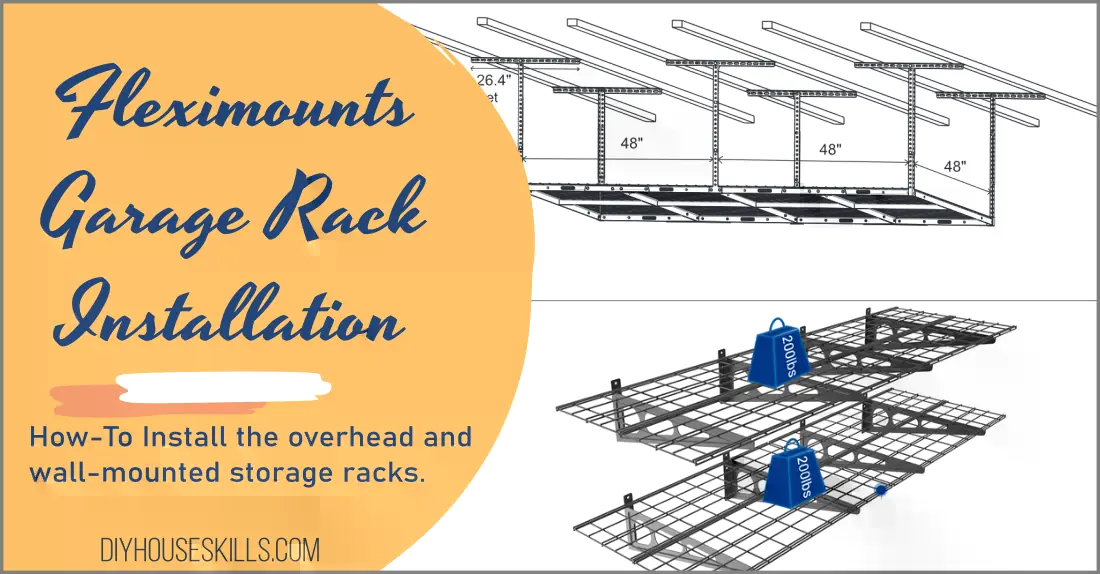
Fleximounts 4×8 Overhead Garage Rack Installation
GR48 Installation
The GR48 is Fleximounts’ largest overhead garage rack. It is designed to store items up to 600 pounds. The installation process is very simple, and it can be done in as little as 30 minutes.
Check out why I think the Fleximounts Garage Storage System is the best on the market.

Step One:
The first step is to decide where you want to install your 4×8 overhead storage rack and determine the spacing of the ceiling joists. You may need to use a stud finder to properly locate the joists, or go into the attic space if possible.
Note: You can install the Fleximounts rack either parallel or perpendicular to the joists.
If two joists are 48″ apart, you can install the rack’s brackets parallel, if not you will have to install the brackets perpendicular.
Note: We are using 48″ measurements because we install a vertical support every 48″.
Step Two:
Use the included template to mark where the brackets will be installed on the joists. Now you can drill a hole about 2.5″ deep at each of these mounting marks using a 4.5mm drill bit.
Step Three:
You can now install and secure the mounting brackets to the ceiling. The far end of each bracket will be 48″ from the next nearest bracket.
Using two of the included tapping screws for each bracket, install all six of the brackets according to your layout from the template.
Note: The vertical support we will install next will be in the center of these brackets.
Step Four:
You will need to figure out the depth of the shelving you wish to have. The shelf can be adjusted from 22″ to 40″ deep.
You will use an upper vertical and lower vertical post to set the depth. Attach both these vertical posts together using two of the included nuts and two bolts. Now attach the other five vertical posts exactly the same way and at the same depth.
Note: The kit has 4x L-Shaped upper and lower vertical posts and 2x flat upper and lower vertical posts. The L-Shaped posts go at the corners, while the flat posts go in the middle.
Step Five:
Attach your vertical posts to the installed ceiling/joist brackets. Again, these vertical posts have to be 48″ apart, and the flat post will be in the middle.
Use the included M8 x 15mm bolts and the M8 nuts for this step.
Step Six:
The lower rack with the support grid needs to be assembled and connected together in this step.
Gather all 4 wire grids and lay them side by side along their long lengths. Use the included M8 x 10mm bolts to attach/connect each grid together. Find the four connecting plates and attach them to the joints between each grid.
Step Seven:
Install the grid to the vertical posts. You will either need another person’s help or use a couple of ladders to rest the grid on to help get it into position.
The four corners of the grid will sit into the L-Shaper bracket’s slot. Use the included bolts to secure the grid in place to each vertical post as well as the middle post.
Step Eight:
Double-check each bolt and nut to ensure they are all tight and secure. Examine the grid placement to make sure it is properly seated and is secure too.
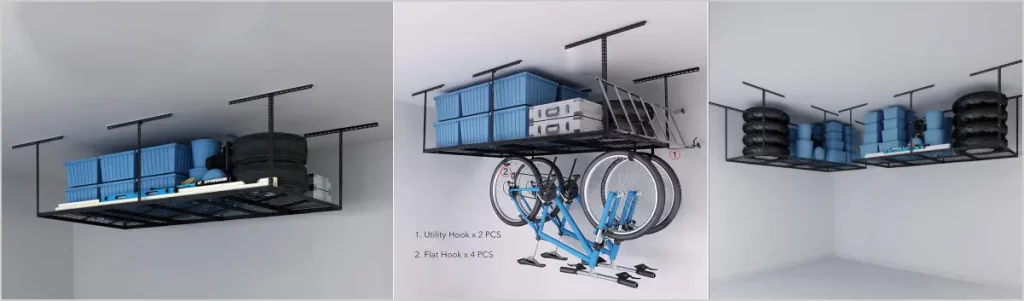
The Fleximounts overhead garage storage system is now ready to be used. Load it up with whatever you need to store. Remember the total load capacity of the GR48 4×8 storage rack is 600 pounds.
Fleximounts Products
The GR Series covers the GR48, GR46, GR38, GR36, and GR28
The 5 sizes of Fleximounts GR series garage racks are 4’x8′, 3’x8′, 4’x6′, 4’x4′, and 3’x6′.
- 400 – 600 lbs capacity
- 22-40 inch height adjustment
- Cold-rolled steel construction
The GR48M Pro 4′ x 8′ Overhead Storage Rack
- 800 lbs capacity
- 22-40 inch height adjustment
- Cold-rolled steel construction
The GL44B 4′ x 4′ Overhead Garage Storage With Lift.
- 300 lbs capacity
- 9 Feet (108″) of maximum vertical lift
- Heavy-duty alloy steel
The GR48F Basic 4′ x 8′ Overhead Garage Storage without decks
- 600 lbs capacity
- 22-40 inch height adjustment
- Cold-rolled steel construction
- Does not come with grid decking. Recommended at least 3/8″ wood decking be used with this product
Fleximounts Garage Wall Shelves
Fleximounts sells wall shelving in the WR Series, WS Series, WRC24B, and BR24.
- The WR Series is a wall rack that can hold up to 400 lbs total with up to a 24″ depth.
- The WS Series is a three-tier wall shelf that can hold up to 150 lbs per shelf with a 12″ depth.
- The WRC24B is a 2′ x 4′ corner wall rack that can hold up to 220 lbs per shelf.
- The BR24 is a 2′ x 4′ 2-pack wall shelf that can hold up to 220 lbs per shelf.
Fleximounts Wall Shelf Installation
The installation of Fleximounts wall shelves is a bit different than their overhead garage storage racks. It is also a very easy install and can be done by one person.
Step One:
First, find the studs in your wall using a stud finder. You will need to use these to secure the Fleximount brackets.
Step Two:
Next, hold the Fleximount template up against the wall where you want it installed and mark the four holes. Ensure the holes will be level.
Use a 3/16″ drill bit to create holes about 2.4″ deep, and then secure the Fleximount bracket to the wall using the included lag screws and washers.
Note: If you are drilling into a concrete wall, you will need to use the included metal expansion bolts.
Now do this for all the Fleximount brackets you need to install.
Once all the Fleximount brackets are installed, it is time to hang your Fleximount shelves on them.
Step Three:
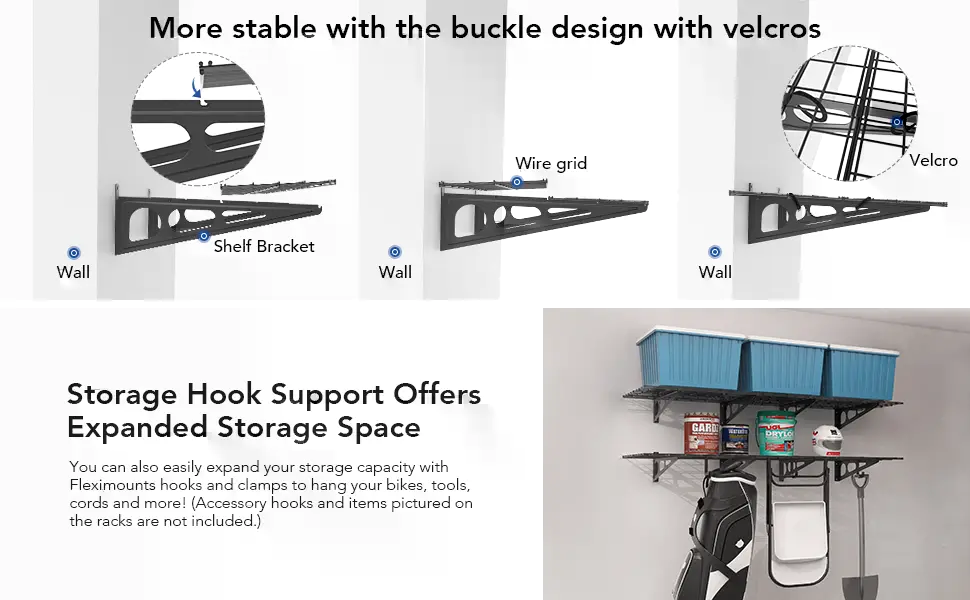
Line up the Fleximount shelf/grid with the Fleximount bracket and then insert the edge of the shelf into the slot in the bracket.
Do this for each Fleximount shelf you are installing. Then, using the included velcro straps, wrap around the bracket and shelf to tie the two together.
Note: Be sure to read the caution statement included with the install kit.

Benefits of Overhead Garage Racks
I like the Fleximounts garage storage systems for several reasons. Some of them are:
- Keep your garage organized and tidy.
- Get your cars back in the garage.
- Store seasonal items up and out of the way.
- Free up floor space for working on projects.
- Gain extra storage without having to build an addition to your home.
- Quality product made with heavy-duty steel capable of supporting heavy loads.
With Fleximounts overhead garage storage racks, you can quickly and easily get your garage organized and tidy. These racks offer a variety of benefits that make them the perfect solution for your storage needs.
With Fleximounts overhead garage storage, you can select a solution to meet your needs; Either overhead storage, wall-mounted storage, or a lift system.
Fleximounts Warranty
Fleximounts offers a 10-year limited warranty that covers defects. You can get a replacement at no charge to you for defective parts. The warranty does not cover damage caused by the user or due to improper installation.
Contact Fleximounts customer support at: contact@fleximounts.com for warranty service.
Fleximounts FAQ
The Fleximounts overhead garage storage is made of cold-rolled steel. The shelves are adjustable in height from 22″ to 40″. The load capacity for the entire system is up to 600 lbs. or 800 lbs. for the pro version.
Yes, the Fleximounts overhead garage storage system is easy to install with the included instructions. All you need are a few basic tools and either help from a friend or a couple of ladders to support the larger 4’x8′ storage shelf.
All you need is a stud finder, drill, and either a screwdriver or power drill. Fleximounts also includes all the necessary hardware and wall templates.
Yes, the Fleximounts overhead garage storage system can be installed both parallel or perpendicular to the ceiling joists.
The Fleximounts overhead garage storage lift system has a vertical lifting height of up to 9 feet (108″). This allows for loading and then lifting items up out of the way.
The Fleximounts overhead garage storage system is designed to work with standard 16″ on-center or 24″ on-center ceiling joists. If you have unusual joist spacing, please contact Fleximounts for assistance.
You will need to decide how much you want to store and where you can install the overhead rack. From there, select the size of rack that fits your need. See my article about the best garage storage systems for more info,
Fleximounts has free shipping via FedEx or UPS in the US and a 60-day return policy.
- DIY Secrets: Finding and Using the Bosch Ice Maker Reset Button

- Chest Freezer vs. Upright Freezer: Which Should You Buy?

- Say Goodbye to Stubborn Stains on Stainless Steel Pots

- Transform Your Morning Brew: Expert Tips for Better Coffee

- Effortlessly Remove Mold From Tile Grout with These Easy Steps

- Proven Strategies to Unclog Your Kitchen Sink Efficiently