Ironing is a practical and useful skill most adults will need to learn at some point in their lives.
It is easy to learn but does require the proper equipment to make you look like an ironing professional.
Are you needing to learn how to iron? We’ll start with the tools of the trade; how to select the right iron and ironing board for you. Then we’ll go step by step on the proper way to iron your clothes.
Ironing Tips For Beginners (Guide)
As I mentioned above, if you’re just starting out learning to iron you will need to purchase at least an iron and an ironing board. You will be using these tools for years so it is better to go ahead and buy a quality iron, it will give you better results and be more comfortable to use.
How Do You Iron A Shirt For Beginners?
To Start–
- Set up the ironing board and plug in the iron. Wait for 2 to 3 minutes to heat up.
- Read the shirt or other garment’s care label to know and understand what it is made of and any caution listed on the label.
- A slightly damp shirt will be easier to iron. You can mist it with water from a spray bottle if you have one. Otherwise, just rely on the steam function of the iron.
- Turn the shirt inside out to start with and iron this side first, you can then turn it back to normal and iron the outside last.
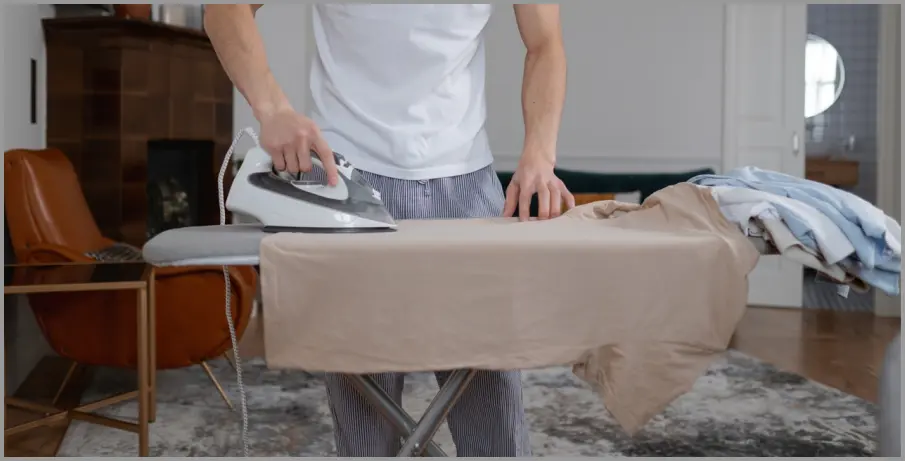
The Process–
Steps: 5
Time Needed: 5 Minutes
Remember to work fairly quickly so you don’t burn the fabric. Keep the iron moving and use the proper temperature to match the fabric. If you are unsure, start with a low-temperature setting on the iron and adjust it upward until the shirt is wrinkle-free.
- Cuffs – Start with ironing the inside of the cuffs of the shirt. Lay the cuff flat and iron until it is smooth, repeat on the outside last. Avoid ironing any buttons on the shirt.
- Front – Next iron the inside front panels of the shirt and then the outside. Again, avoid ironing the buttons as they can be damaged. Use the tip of the iron to go around the buttons. Also, iron the pocket of the shirt from the inside.
- Back – Layout the shirt and start ironing the inside of the back panel first, then the outside. Use big passes of the iron from the top to the bottom of the shirt.
- Collar – Last, iron the collar starting on the inside or underside, then the outside. Fold the collar down and iron across the seam or stitching to have it hold its shape.
- Wrinkles – If you have any stubborn wrinkles use the steam function of the iron and or add a little moisture from a spray bottle.
Note: Where you start ironing on your shirt is up to you. Feel free to start with the collar if you wish. Just make sure not to rush and make even passes along the fabric.
When you are finished go ahead and put the shirt on a hanger and button it up. You want to keep it wrinkle-free for your next use.
Also read: How To Shine Shoes At Home (Boots Too) 4 Easy Steps
What Should I Look For When Buying An Iron?
Hopefully, you know what an iron is and looks like.. We’re talking about steam irons; the kind you fill with water and plug into an outlet.
These irons get hot, generally about 250 °F to 360 °F.
Basics To Look for In An Iron:
- Large iron but with a comfortable weight.
- A long cord that is easy to maneuver.
- High-watt iron will provide better heat and steam.
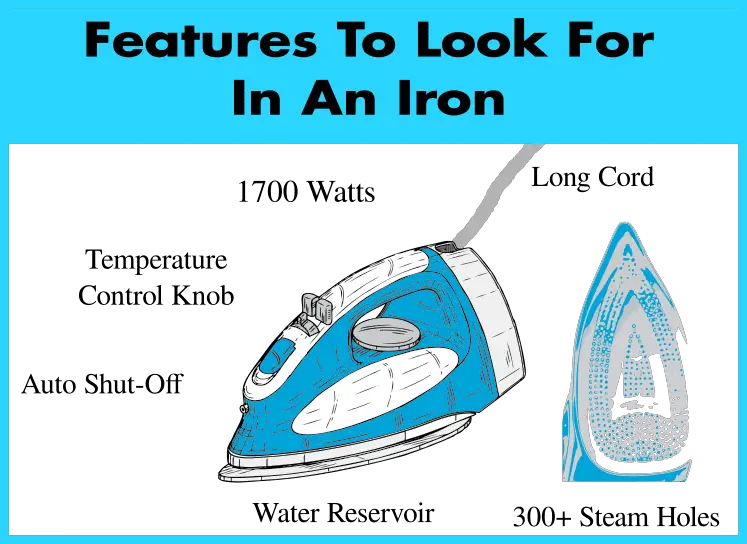
Features To Look For In An Iron:
- A quality soleplate such as stainless steel.
- 300+ steam holes.
- Easy control thermostat knob.
- Automatic shut-off.
To put this all together, when selecting an iron look for one that will be comfortable for you to handle and that has a long cord that won’t get in the way.
Choose an iron with a heat capacity of about 1700 watts as this will not only make ironing easier but quicker too. Also, high heat will produce enough steam that some clothes need.
A good soleplate will glide across the fabric and hold up to years of high heat. Having 300 or more holes in the soleplate will provide an even steam distribution.
It makes sense to have a control knob that will easily select the ideal heat and steam output based on fabric.
And finally, an automatic shut-off feature provides a level of safety to prevent accidents.
~1700 Watts, quality soleplate, control knob, and auto shut-off.
How Much Does An Iron Cost?
Avoid cheaper irons below the price point of about $25 US. These won’t last and will have a cheaper soleplate that may start to flake off. Get the best you can afford, but roughly look to spend about $60 to $100.
Avoid Cheap Irons, Spend Between $60 and $100.
How Do I Choose An Ironing Board?
Look for a sturdy ironing board that won’t tip over easily and also can be adjusted to a comfortable height. Obviously, you can use almost any flat surface and place a towel down, but again, the right tool for the job is the better choice.
Ironing boards are not expensive so go out and purchase one along with your new iron.
Also read: Easy Newbie Home Maintenance (Will Save Money)
How to Use the Steam Function on Your Iron
An Iron with the steam function constantly produces steam when it is hot. Steam is applied to the shirt which helps to quickly get rid of wrinkles. Again, be sure to double-check the shirt’s care label to avoid applying too much heat and steam.
How To Clean Your Iron
Occasionally it will be a good idea to clean your iron. This won’t take long and will keep it like new.
To clean your iron mix some baking soda and water together into a light paste. You only need a small amount, about 2 tablespoons of baking soda to 1 tablespoon of water. With a cloth, wipe this on the soleplate to remove any buildup.
Use a cotton swab to get in and clean the steam holes. Next, be sure to remove any excess and dry the iron.
Clean the water reservoir at this time too. Add equal parts water and vinegar, then let the iron heat up and steam for a few minutes. Unplug the iron and let cool, then drain the reservoir and finally add clean water to repeat the process.
Also read: How to Accessorize Your Kitchen Countertop: Tips and Ideas
Where To Buy An Iron?
Clothes irons are available almost anywhere, from big box stores to home improvement places. Check CVS or Walgreens as well as online sites such as Amazon. It is a good idea to compare models and see them in person so you can get a feel for their size and weight.
Final Tips
As I mentioned above, a damp shirt is best when ironing. Remove it from the clothes dryer before it is completely dry and iron it straight away.
Double-check your clothing care labels for best ironing practices and set the iron to the correct temperature.
Don’t leave your iron powered on and unattended. Even if it has an auto shut-off feature, the iron gets very hot and you always want to be careful.
Empty the water reservoir after each use. It’s best to start with fresh water each time.
Do not iron the buttons of clothes. If they are plastic they might melt, or at least be damaged and make a mark.
The last thing is to take the time to iron your clothes. You will look more put-together and have an appearance that will make a great first impression.
Read Next: The Best Garage Storage Systems to organize your space.
Other Home Related Articles:
- How To Conserve Water At Home | How Can I Lower My Water Bill?
 People in the United States use a lot of water. Most of us take for granted a constant and steady supply of clean fresh water in our homes. As the weather becomes more unpredictable and… Read more: How To Conserve Water At Home | How Can I Lower My Water Bill?
 - Outdoor Pizza Oven Buying Guide | How to Buy
 This article is a guide about selecting and buying the best outdoor pizza oven. Do you love pizza as much as we do? If so, you’ll know that there’s nothing quite like the taste of… Read more: Outdoor Pizza Oven Buying Guide | How to Buy
 - Top Stand Mixers on Amazon: Most Wished For
 Stand mixers are no longer just a want—they are a need in the modern kitchen! Imagine whipping up fluffy meringue, kneading robust bread dough, or creating perfectly smooth cake batter, all at the touch of… Read more: Top Stand Mixers on Amazon: Most Wished For
 - One-Piece vs. Two-Piece Toilets: Making the Right Choice
 Choosing Between One-Piece and Two-Piece Toilets You’re remodeling your bathroom and it’s time to pick a new toilet, but you’re stuck on a common dilemma: one-piece vs. two-piece toilet? Both get the job done, but… Read more: One-Piece vs. Two-Piece Toilets: Making the Right Choice
 - Must-Have Countertop Ice Makers: Efficient Solutions for Every Home
 Quick Overview Countertop ice makers are a versatile solution to your ice-making needs, providing convenience and efficiency for home, office, or even on-the-go use. This guide explores five standout models: THIS POST MAY CONTAIN AFFILIATE… Read more: Must-Have Countertop Ice Makers: Efficient Solutions for Every Home