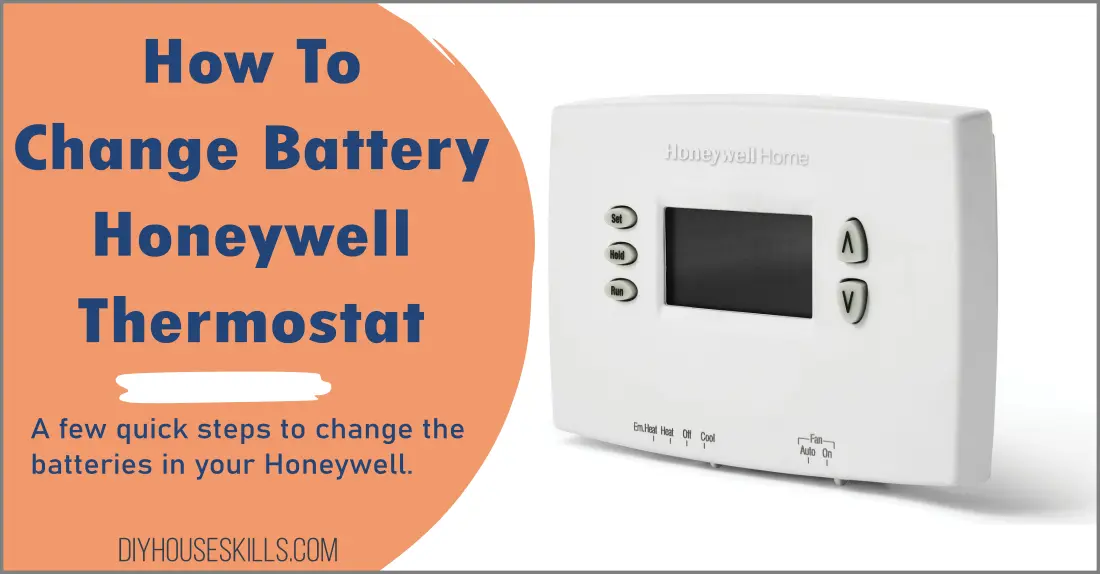
- In this blog post, we’ll show you how to change the battery in your Honeywell thermostat.
- If your thermostat is showing a low battery display or isn’t working properly, it’s probably time to change the batteries.
- Depending on the model of your Honeywell thermostat, you may need to replace the batteries every 1-2 years.
Follow the steps below to safely and easily change the batteries in your Honeywell thermostat.
To Change the Batteries on a Honeywell Thermostat:
- Turn off the power to your thermostat at the breaker box.
- Remove the faceplate from the wall.
- Locate the batteries inside the thermostat.
- Remove the old batteries and insert new ones in their place.
- Replace the front cover of your thermostat.
- Turn the power back on at the breaker box.
These 6 steps are all it takes to replace your battery but see below for a more detailed explanation.
THIS POST MAY CONTAIN AFFILIATE LINKS. As an Amazon Associate, I earn from qualifying purchases. PLEASE READ MY DISCLOSURE FOR MORE INFO.
How To Change Batteries Honeywell Thermostat
If your Honeywell thermostat is having trouble starting up, or if the display is flickering, it may be time to change the batteries. Here’s how to do it:
- Turn off the power to your thermostat at the breaker box. This is an important step because you want to ensure that you don’t accidentally short-circuit anything while changing the batteries.
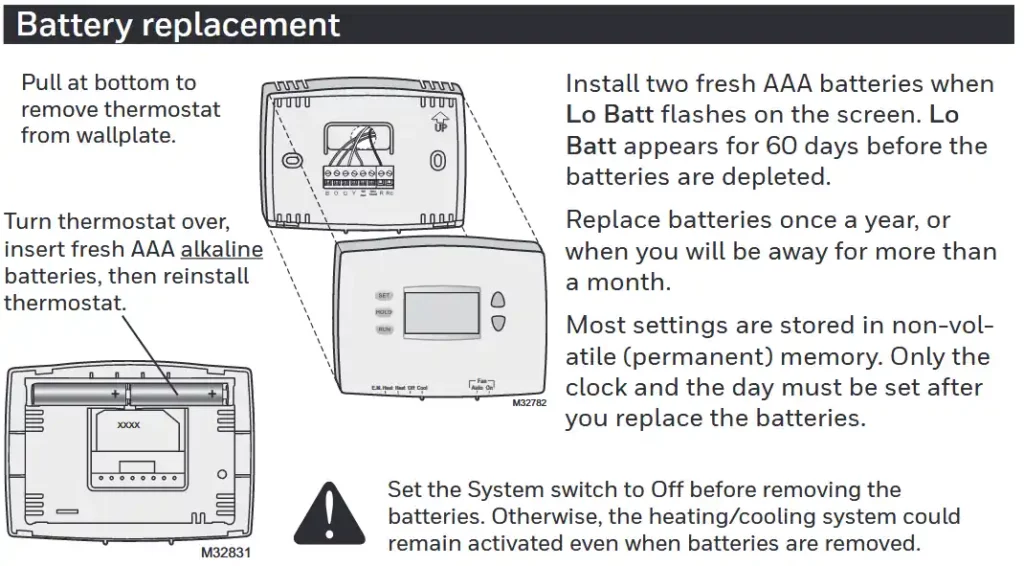
- Remove the faceplate from the wall. For most models, you will need to gently pull the bottom of the faceplate away from the mounting plate. If your model has screws, unscrew them first before removing the faceplate.
- Locate the batteries inside the thermostat. There will typically be two AA or AAA batteries inside. You may also see a wire connected to one of the batteries – this is normal and is used as a backup power source in case of a power outage.
- Remove the old batteries and insert new ones in their place, being careful to observe correct polarity (positive + and negative -). If there was a wire connected to one of the old batteries, simply reconnect it to the new battery in the same spot.
- Replace the front cover of your thermostat and reattach any screws that were holding it in place. Once everything is back together, go to the final step.
- Turn the power back on at the breaker box and test your thermostat to make sure it’s working properly.
Replacing Your Honeywell Thermostat Battery Tips:
- Know that some newer WiFi-enabled thermostats do not require batteries as they are powered by a C Wire. Check your model’s documentation to see if this is the case for you.
- If your Honeywell thermostat runs on AA or AAA batteries, we recommend using alkaline batteries as they tend to have a longer lifespan than other types of batteries.
- Be sure to write down the current settings on your thermostat before you remove the faceplate. This way, you can easily reset them after changing the batteries.
- Gently pull the bottom of the faceplate to remove it from the wallplate. Be careful and watch to ensure you are not also pulling the wallplate away from the wall.
- If you need support, contact Honeywell US Customer Care at 1-800-468-1502.
ALSO READ: Easy Newbie Home Maintenance (Will Save Money) for a free checklist to get you started in learning what needs to be inspected around your home.
When Should You Change the Honeywell Thermostat Battery?
Most thermostats will display and flash “Lo Batt” or “Replace Batt” 60 days before the batteries run out.
The general rule of thumb is to change your batteries once per year, but this may vary depending on the model of your thermostat and the type of battery it uses.
If your thermostat uses AA or AAA batteries, you will probably need to replace them every 1-2 years. If your thermostat uses a lithium battery, you may only need to replace it every 3 years.
You can check your owner’s manual for specific recommendations on how often to change the batteries in your model of the thermostat.
What Type of Battery Does a Honeywell Thermostat Use?
The type of battery your thermostat uses will depend on the model. Some models use AA or AAA batteries while others may use a lithium battery.
| Thermostat Series | Thermostat Model | Batteries |
|---|---|---|
| VisionPRO 8000 WiFi | TH8321WF1001/U | n/a |
| PRO 1000 Series | TH1100DV, TH1110DV, TH1210DV | 2x AAA Batteries |
| RTH230b | 69-1800 | 2x AA Batteries |
| PRO 2000 HORIZONTAL | TH2110DH, TH2210DH | 2x AAA Batteries |
| TH4110B 5-2 DAY | TH4110B1009/U, TH4110B1017/U, TH4110B1025/U, TH4110B1033/U | 2x AA Batteries |
| PRO 2000 VERTICAL | TH2110DV1008/U, TH2210DV1006/U | 2x AAA Batteries |
| 5-2 DAY PROGRAMMABLE | RTH6350D1000/U | 2x AA Batteries |
| PRO 1000 HORIZONTAL | TH1210DH1001/U, TH1110DH1003/U, TH1100DH1004/U | 2x AAA Batteries |
| T4 Pro Programmable | TH4110U2005/U | 2x AA Batteries |
If your thermostat uses AA or AAA batteries, you can purchase these at most hardware stores or online. If your thermostat uses a lithium battery, you may need to order it directly from Honeywell or a similar manufacturer.
Change Battery Honeywell Thermostat Summary
That’s all there is to change the batteries in your Honeywell thermostat. Following these simple steps will ensure that your thermostat continues to work properly for years to come.

I’m J.S., I created and am the content manager at DIYHouseSkills.com. I do the research and write the articles that appear on this website. I’ve learned many household skills during my life and think it’s important to at least know the basics so that you can save yourself time and money… READ FULL BIO >
Related Posts
- Samsung Robot Vacuum Troubleshooting + AdviceSamsung robot vacuum troubleshooting is for anyone experiencing issues with their POWERbot vacuum. Answers to your Samsung robot vacuum problems are covered in my article as I discuss the most common issues users have. Troubleshooting Samsung POWERbot Vacuums Robot vacuum problems can be a real headache. These intelligent devices make life easier when operating as expected. However, when issues arise it can be difficult to… Read more: Samsung Robot Vacuum Troubleshooting + Advice
- Instant Pot Problems, Best Guide To FixUpdated: 10/29/2022 It’s no fun when you attempt to use your Instant Pot and discover some problems with it. Whether it is not sealing correctly, leaking, or you see error codes, this guide will help you troubleshoot and fix those issues to get you back to cooking. Users of all levels can resolve their Instant Pot problems with my step-by-step guide such as fixing error… Read more: Instant Pot Problems, Best Guide To Fix
- Coffee Maker Cleaning for a Tastier Daily BrewDespite their importance in our morning routines, coffee makers are often overlooked when it comes to regular cleaning. However, neglecting to clean your coffee maker can have a significant impact on the quality and healthiness of your daily brew. In this post, we will explore the reasons why regular cleaning of your coffee maker is crucial. We will provide a simple and effective cleaning method,… Read more: Coffee Maker Cleaning for a Tastier Daily Brew
- How To Descale A Nespresso Machine: Instructions GuideTo help you maintain peak performance from your Nespresso machine, we’ve put together this guide on descaling. Follow these steps diligently to keep your coffee experience at its best As a proud owner of a Nespresso machine, you already know the joy it brings to your morning routine. The rich aroma and velvety smooth taste of each cup are unparalleled. However, to ensure that your… Read more: How To Descale A Nespresso Machine: Instructions Guide
- Easy Dishwasher Cleaning: How to Remove Odors, BacteriaThe best guide for easy dishwasher cleaning Your dishwasher is one of the most important appliances in your home. Not only does it make clean-up a breeze, but it also helps to keep your dishes clean and bacteria-free. However, if you don’t clean it on a regular basis, it can become a cesspool of bacteria, fungus, and odors. In this blog post, we will discuss… Read more: Easy Dishwasher Cleaning: How to Remove Odors, Bacteria
